

How to Remove Bicycle Oil from Clothes
Bicycle oil is a common substance that can easily get onto clothes, leaving behind a stubborn and difficult-to-remove stain. This can be a frustrating problem for cyclists, as well as anyone else who may come into contact with bicycle oil. The oil can seep into the fibers of the fabric, making it challenging to remove without damaging the clothes.
There are various types of bicycle oil, with different formulations and levels of viscosity, and they can each leave different types of stains. Some bicycle oils are designed to be highly water-resistant, which can make removing the stains even more challenging. In addition, some fabrics, such as silk or wool, are more delicate and prone to damage from harsh cleaning agents, making it important to choose the right cleaning methods for removing the stains.
The purpose of this outline is to provide step-by-step instructions for removing bicycle oil from clothes, in a way that is safe and effective for the fabric. By following these guidelines, you can restore your clothes to their original condition, without damaging the fabric or causing further staining.
Preparation: Materials Needed
The first step in removing bicycle oil from clothes is to gather the necessary materials. You will need:
Liquid dish soap: This will be used to break down the oil and lift it from the fabric. Choose a gentle, non-abrasive dish soap that is safe for the fabric.
White vinegar: Vinegar can help to neutralize the odor of the oil and also aid in breaking down the stain.
Baking soda: Baking soda is a natural cleaning agent that can help to remove oil and lift the stain.
Absorbent cloth or paper towels: These will be used to blot the stain and remove the excess oil.
Laundry detergent: Laundry detergent will be used in the washing machine to remove the remaining stain and freshen up the garment.
Access to a washing machine: You will need a washing machine to thoroughly remove the stain from the garment.
Preparation: Testing for Colorfastness
Before proceeding with stain removal, it’s important to check the garment for colorfastness. This means making sure that the color in the garment will not run or fade when it comes into contact with the cleaning solution.
To test for colorfastness, apply a small amount of the cleaning solution (dish soap and water, or vinegar and water) to an inconspicuous area of the fabric, such as the inside seam or hem. Let it sit for a few minutes, and then blot it with a clean cloth. If the color remains unchanged, it is safe to proceed with the stain removal on the entire garment. If the color fades or runs, do not use that cleaning solution on the garment and consider professional cleaning.
Removing the Stain
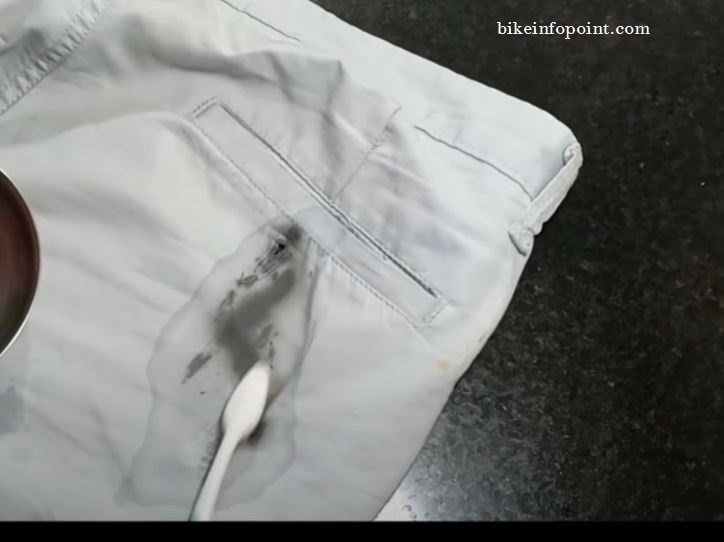
Step 1– Blot the Excess Oil: The first step in removing bicycle oil from clothes is to blot the excess oil. This will help to prevent the oil from spreading and making the stain worse.
Place a clean, absorbent cloth or paper towel under the stain. This will help to absorb the oil as you blot.
Blot the stain to remove as much of the excess oil as possible. Apply gentle pressure, being careful not to rub the oil into the fabric. Repeat this step until no more oil is transferred to the cloth or paper towel.
Step 2– Apply Dish Soap: The next step is to apply liquid dish soap to the stain. This will help to break down the oil and lift it from the fabric.
Wet the stain with water. This will help to loosen the oil and make it easier to remove.
Apply a small amount of liquid dish soap directly to the stain. Work the soap into the stain using your fingers or a clean, soft-bristled brush.
Let the soap sit on the stain for 5-10 minutes. This will give it time to penetrate the oil and break it down.
Step 3– Rinse with Water: After the soap has had time to penetrate the oil, it’s time to rinse the garment.
Rinse the soap from the garment using cold water. This will help to remove the soap and any loosened oil.
Blot the stain to remove as much of the soap as possible. Repeat this step until no more soap is transferred to the cloth or paper towel.
Step 4- Apply White Vinegar: The next step in removing the stain is to apply white vinegar. This will help to neutralize the odor of the oil and also aid in breaking down the stain.
Mix equal parts white vinegar and water in a bowl.
Dip a clean cloth into the solution and apply it directly to the stain.
Blot the stain with the vinegar solution, being careful not to rub the oil into the fabric. Repeat this step until no more oil is transferring to the cloth.
Step 5- Apply Baking Soda: After the vinegar has been applied, the next step is to apply baking soda. Baking soda is a natural cleaning agent that can help to remove the oil and lift the stain.
Sprinkle baking soda over the stain.
Rub the baking soda into the stain using your fingers or a clean, soft-bristled brush.
Let the baking soda sit on the stain for 10-15 minutes. This will give it time to penetrate the oil and break it down.
Step 6- Wash the Garment: The final step in removing the bicycle oil stain is to wash the garment. This will help to remove the remaining stain and freshen up the garment.
Fill the washing machine with water and add a small amount of laundry detergent.
Place the garment in the washing machine and wash it according to the care label instructions.
Check the garment after washing to make sure that the stain has been removed. If the stain is still present, repeat the entire process from Step 1.
Hang the garment to dry or place it in the dryer, according to the care label instructions.
By following these steps, you should be able to remove the bicycle oil stain from your clothes and restore them to their original condition.
Be mindful of where you place your clothes while working on your bicycle, and avoid leaning on or placing them on surfaces that may be contaminated with oil.
Bicycle oil stains can be difficult to remove, but with the right techniques, it is possible to restore your clothes to their original condition. By following the steps.